
Unexpected Opportunities
Sometimes unexpected opportunities present themselves when you least expect it. I don’t engage in social media conversations very often unless something catches my interest. Several months ago, I jumped onto a friend’s post having to do with calendula also known as pot marigold. It has vibrant, yellowy-orange blooms and has many healing qualities aside from being beautiful. Somehow the conversation evolved into learning more about essential oils and hydrosols. Great, I think to myself. I know about these things. But my next thought is how can I teach anything about hydrosols when I don’t have a still? After learning the process in one of my classes, I realized that buying a copper still was way out of my price range, so I put the idea on the back burner. One more thing to add to my wish list. Bummer, right? Well, not really. This conversation prompted me to do a bit of research. Lo and behold, there are many clever individuals who figured out how to make hydrosols on a budget, and most of us have the supplies right in our own kitchens!
What is a Hydrosol?
Hydrosol isn’t a term most people are familiar with unless you happen to be of a holistic, spiritual mindset and love herbs and essential oils. So, what is a hydrosol? In easy-to-understand terms, it simply means floral water, which is the aromatic remains created from steam distilling plant material. Hydrosols can include any or all parts of the plant. They are simply the water portion of the essential oil distillation process. In the past, hydrosols were discarded as waste but are now recognized for their beneficial healing and spiritual properties.
WHAT IS THE DIFFERENCE BETWEEN ESSENTIAL OILS AND HYDROSOLS?
Essential oils are the oil-soluble part of the plant.
Hydrosols are the water-soluble part of the plant and contain microscopic drops of essential oil.
WHY USE HYDROSOLS?
Hydrosols and essential oils share many commonalities but hydrosols have a unique molecular makeup and different aromatic profiles than essential oils. Hydrosols have a soft, subtle fragrance, sometimes quite different than the essential oils.
They are more sustainable because hydrosols yield greater amounts than essential oils.
They are safer than essential oils, so they can be used on babies and pets.
Hydrosols contain more healing and spiritual components of the whole plant and can be used to make a lot of other amazing, homemade products.
A Quick Tutorial
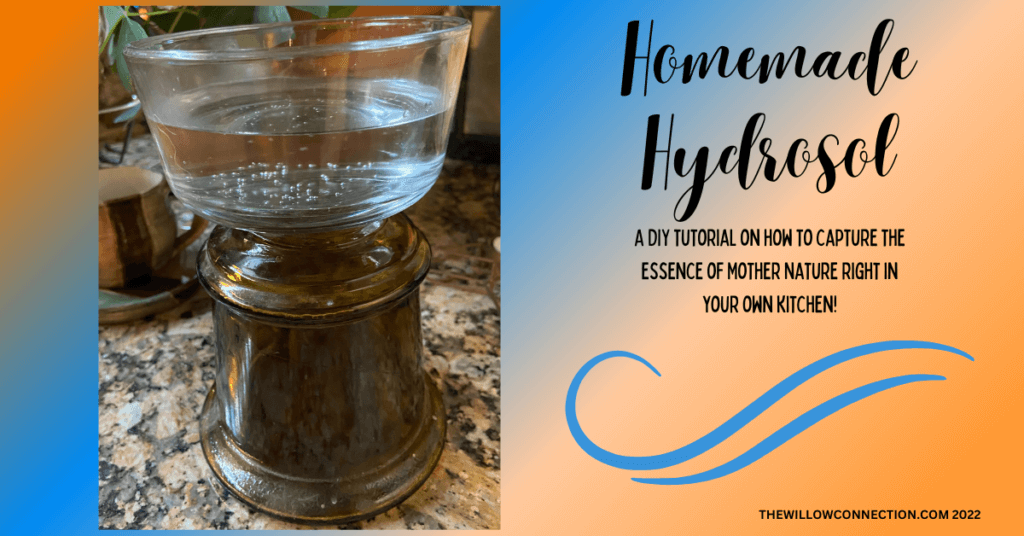
This is a budget-friendly way to get started making your own hydrosols! You will need a large canning or stock pot with lid and handle, a medium-sized glass bowl, one smaller glass collection bowl, distilled water, ice, plant matter (lavender, weeping cedar, pine, chamomile, etc.) and about 3 hours of your time.
Make sure all your supplies are washed in hot, soapy water. Any bacteria will ruin your hydrosol.
Put the medium-sized bowl upside down on the bottom of your stock pot.
Place your plant matter around the bowl. You may cut it up a bit to expose more surface area to release more oils. If time permits, you can even soak your plant matter for a few hours in the pot before heating as this will begin breaking down the plant matter before heating.
Pour enough distilled water over the plant matter to cover. Using distilled water ensures that no contaminants are in the water, which may corrupt your final product.
Put the smaller bowl on top of the medium-sized bowl. Make sure the lid will fit over the smaller bowl once it is turned upside-down. The handle of the lid needs to be hovering over the opening of the bowl to collect the liquid.
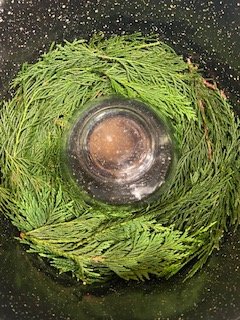
Turn the lid upside-down and place on stock pot. Make sure you have a decent seal as you don’t want water vapor escaping from your pot. If your lid doesn’t fit properly, consider using another pot
Place enough ice on the lid to cover the middle area of the lid. The lid will collect your melting ice. This will need to be monitored carefully. You need to discard melted ice and replenish often throughout this process. The steam is hot, so be careful when you remove the lid. Discard melted ice. You may put ice in a sealed plastic bag and place on the lid, which lessens your need to watch it melt because the water is contained in the bag. However, you must always have enough ice on the top to create condensation. It needs to stay cold on top!
Turn your burner onto medium to begin heating the water. When it starts to gently bubble, turn the heat down to low. If the temperature is too high, water will begin to boil inside the glass bowl that is upside-down in the stock pot. This moves your collection bowl, which may result in spillage back into the stock pot. We do not want that! As your water heats up, the ice on the top of the lid will create condensation within the stock pot. It will drip down the handle of the lid into the smaller glass collection bowl.
Make sure that you check your hydrosol regularly to ensure there is always water in the stock pot. Add water as needed. If the plant matter gets scorched, throw it away. You can also check your collection of liquid that is dripping from the handle of the upside-down lid into your smaller glass bowl. This IS your HYDROSOL!

After 2-3 hours of collecting your hydrosol, carefully remove the bowl. It will be very hot. Set it aside to cool and then put into a glass jar. Each batch renders a different amount of hydrosol, but I have found that I average about 1/3 cup. Label and date your hydrosol. Keep your hydrosol refrigerated. It should keep for about a year but check periodically for mold. After all, this is a water product with no preservatives. If you see molding, throw it out. Chances are you will have already turned your hydrosol into something else, so the chances of molding will be greatly minimized.
Trouble-Shooting
I taught my first class recently using this method. I presented to a wonderful circle of women who were all eager to learn and share their ideas with me. I talked about what could go wrong when you are using an electric stove or hot plate. Unlike propane, the temperature seems to ebb and flow causing the bowls to become unbalanced. One woman suggested placing a few jars upright instead of one bowl upside-down.I think she’s on the right track. I may try experimenting with one taller glass vessel with a mouth wide enough to allow another bowl to rest inside it to collect the hydrosol. I think this will eliminate some of the rocking or shifting that happens when the water heats up within the upside-down bowl. However, I may have to add some water to the inside of the bowl to equalize the pressure. I am concerned that the glass may shatter if it heats up with nothing in it. Food for thought. I was grateful for their support and feedback. It’s a bit uncomfortable to teach with your fingers crossed. Luckily, nothing broke or spilled and there was enough hyrdrosol for everyone to take home a sample for their own use. This is another reason why I like teaching to a crowd of women because everyone brings something to the table. We are all teachers. We are all students. Amen!
WHAT CAN YOU DO WITH HYDROSOLS?
Believe it or not, you can create a variety of products with your finished product, such as spritzers, lotions, creams, personal fragrances, insect repellants, ritual water, simple syrups, and teas. Do some research and find a recipe online that suits your fancy. Start with something simple. In the class I mentioned earlier, we focused on the spiritual use of hydrosols in our meditations or energy healing services. Start with an herb you are familiar with or one that resonates with you for a particular reason. Once you have made the hydrosol, I believe you will be intuitively guided on what to make or how to use it. Just have fun with it. Enjoy!